Body Editing AI: How It Works and What Results to Expect
ImagesArt.ai
11/4/2026
You've got a clothing photo ready for tomorrow's campaign, but the outfit is wrong for the promotion. Meanwhile, a creator asks whether the same tool can make their silhouette slimmer for a thumbnail. Both requests fall under body editing AI, but they need different controls, different expectations, and very different conversations about consent.
The useful question isn't whether AI can change a body. It's whether you can limit the change, keep the person recognizable, and explain the result clearly. For creators and small teams, that's the difference between a workable production shortcut and an image you shouldn't publish.
Table of Contents
- Body Edit Types and What Each Realistically Delivers
- How Body Editing AI Keeps a Person Recognizable and How to Check It
- Consent, Disclosure and Client Work Limits
- How to Run a Controlled Body Edit Step by Step
- Output Settings for Reels, TikTok Ads and Product Demos
- Body Image Risks and a Safe Editing Framework
- Run Your First Controlled Test
Body Edit Types and What Each Realistically Delivers
Say a clothing brand wants the same model shown in several outfits, while a creator wants a slimmer silhouette for a thumbnail. The clothing job asks the system to reconstruct fabric around an existing body. The thumbnail request changes the person's apparent anatomy. Treating them as equivalent retouching tasks is a mistake.
Body editing AI covers local replacements, structural changes, and entirely synthetic people. A convincing preview doesn't establish that an edit is accurate, authorized, or appropriate for advertising.
Body edit types, controls and realistic results
| Edit type | How it is controlled | Realistic result | Main limit |
|---|---|---|---|
| Pose change | Pose reference or skeleton guidance | Same person in a new posture | Hands and limbs may distort |
| Clothing swap | Mask over the garment plus a reference image | New outfit on the same body | Folds, logos and texture can drift |
| Background or skin tone | Mask over backdrop or skin area | Clean replacement of backdrop or tone | Edges around hair and fingers need checks |
| Body shape or proportions | Low-strength mask on waist, shoulders or limbs | Subtle reshaping | Can imply weight loss or altered anatomy; highest body-image and consent risk |
| Facial structure | Full-face prompt or reference image | Face looks like a different person | Identity drift; high consent risk |
| Full synthetic figure | Text prompt with no source body | An invented person | Hard to verify; needs clear labeling |
Rank the task before choosing the tool
For a first production test, background replacement is lower-stakes than anatomical reshaping. Clothing recoloring is also relatively contained, provided it doesn't misrepresent a product you're selling. A clothing-change workflow is most useful when you can isolate the garment and compare the result against a real reference.
Pose changes need more scrutiny because the system must invent previously hidden surfaces. Body reshaping needs explicit authorization even when the visual adjustment looks small. Skin-tone changes aren't equivalent to background cleanup either: correcting a lighting cast differs from changing someone's apparent complexion or identity.
The first four categories retain a real source photograph. The last two can produce appearances or people who never existed, although a facial edit can still identify, and affect, the original subject.
Practical rule: Rank edits by both visual difficulty and human consequence. A technically easy change can still carry substantial consent risk.
Find the row that matches your goal and read its limit before generating anything.
How Body Editing AI Keeps a Person Recognizable and How to Check It
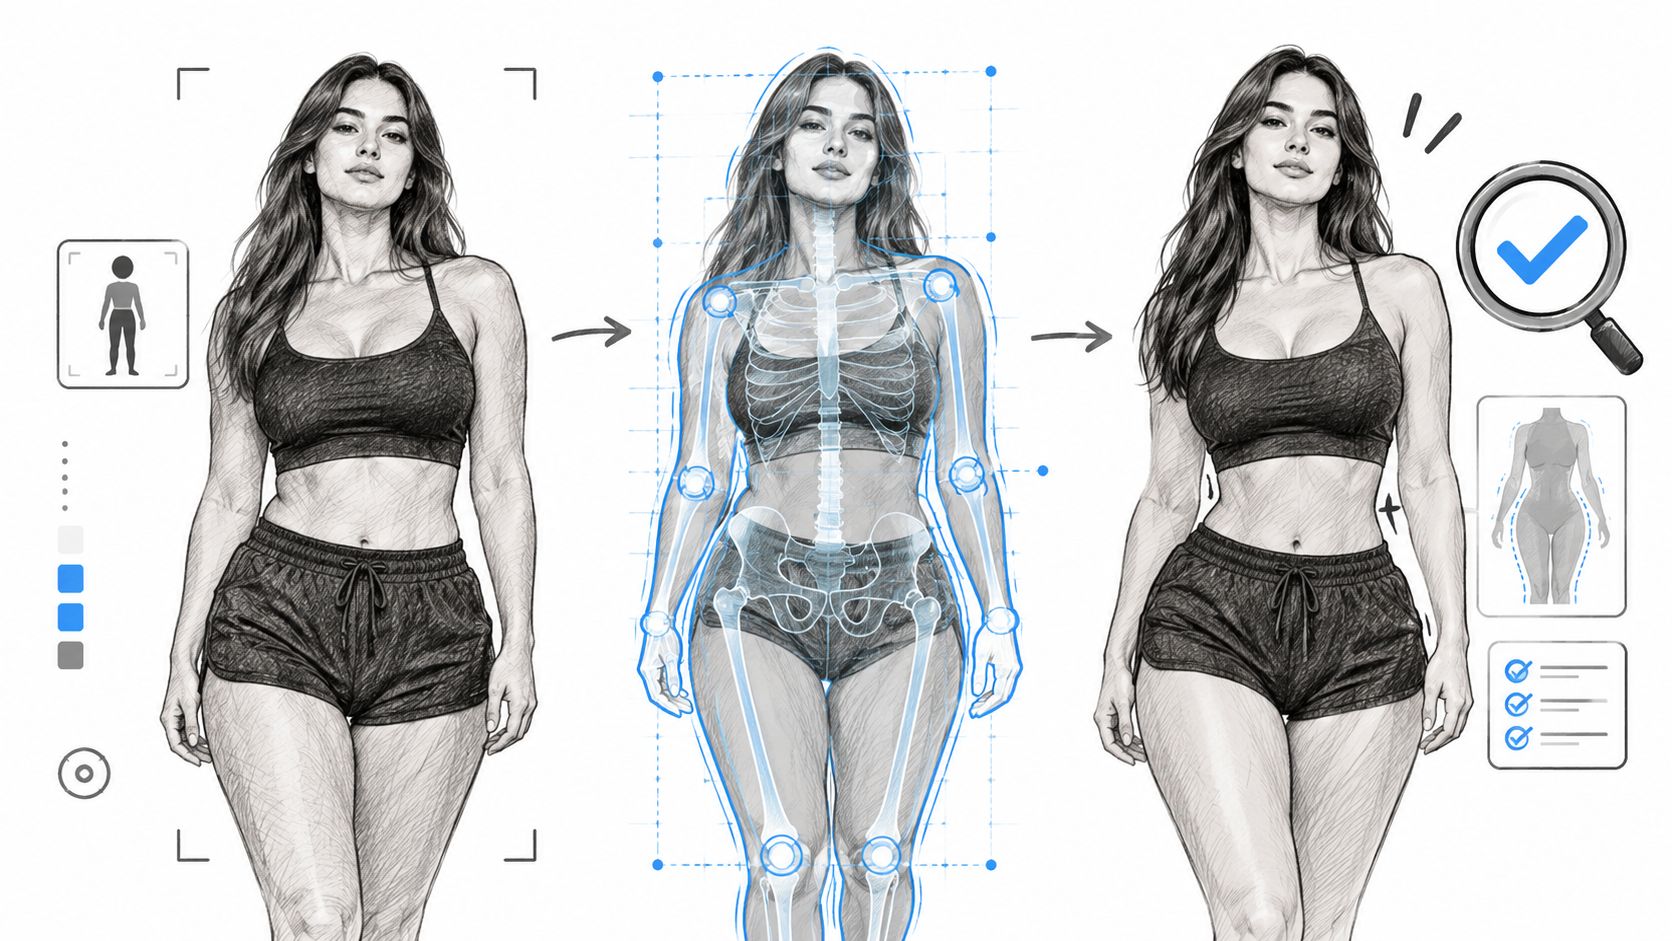
Think of tracing a figure before repainting it. The model needs a map of where the body sits before it changes anything inside that map. Without that structure, a convincing sweater can still end up attached to an implausible shoulder.
The map isn't just an outline. It describes joints, editable regions, and the relationship between visible surfaces and the person's body.
Align the person before rebuilding the image
Pose estimation locates joints and places a skeleton over the photograph. Body segmentation separates regions such as a shirt, exposed arms, and background. Dense surface mapping links image locations to points on the body, helping garments and skin follow the figure rather than merely occupying similar pixels.
The PA-VTON paper describes separately trained skeleton and DensePose guidance modules with adjustable inference weights to preserve pose, body details, and spatial placement. That supports a practical selection criterion: prefer controllable structure guidance over unrestricted full-image regeneration when the person must remain recognizable.
The TryOnDiffusion paper describes a dual-branch Parallel-UNet with cross-attention that combines implicit garment warping and blending while preserving garment details at 1024 × 1024 resolution. That's a research-system capability, not a guarantee for every consumer editor.
The production lesson is straightforward:
- Preserve source detail. Keep the original high-resolution file rather than starting from a compressed social download.
- Establish correspondence. Align source appearance with the target pose and shape before asking the generator to reconstruct it.
- Refine locally. Use masked diffusion to rebuild boundaries, folds, and hidden areas without unnecessarily replacing the rest of the image.
Skip alignment and you can get stretched fabric, misplaced limbs, or a silhouette that shifts around the garment. Increasing output resolution won't repair those structural mistakes.
Score separate qualities, not overall attractiveness
Use a review sheet with independent pass-or-fail fields. An attractive image can fail identity preservation; a recognizable person can still have an impossible wrist.
| Check | What to inspect | Reject when |
|---|---|---|
| Identity | Face shape, distinctive features, hairline, apparent age | The subject looks like someone else |
| Structure | Joints, limb count, seams, silhouette, contact with objects | Anatomy or garment placement becomes implausible |
| Texture | Fabric weave, skin detail, logos, lettering | Product details change or become unreadable on a phone |
| Realism | Lighting, shadows, boundaries, hidden surfaces | Ghosting or inconsistent edges remain at normal viewing size |
For casting materials, identity deserves particular care. If you use resources such as Secta Labs to generate actor portfolio headshots, compare outputs with current photographs rather than treating polish as proof of likeness. A portfolio image should represent the person someone will meet.
Video adds temporal and accessibility checks. Watch at normal playback speed for changing faces, crawling seams, and flickering garment details, then inspect suspicious transitions closely.
The WCAG flashing guidance sets a threshold of no more than three general flashes or three red flashes within any one-second period, with an alternative assessment based on flashed area. Remove strobe-like effects and test the final export, not just the generation preview.
If a check fails, rerun only the affected masked area and review again. If identity drifts, don't publish the edit.
Consent, Disclosure and Client Work Limits
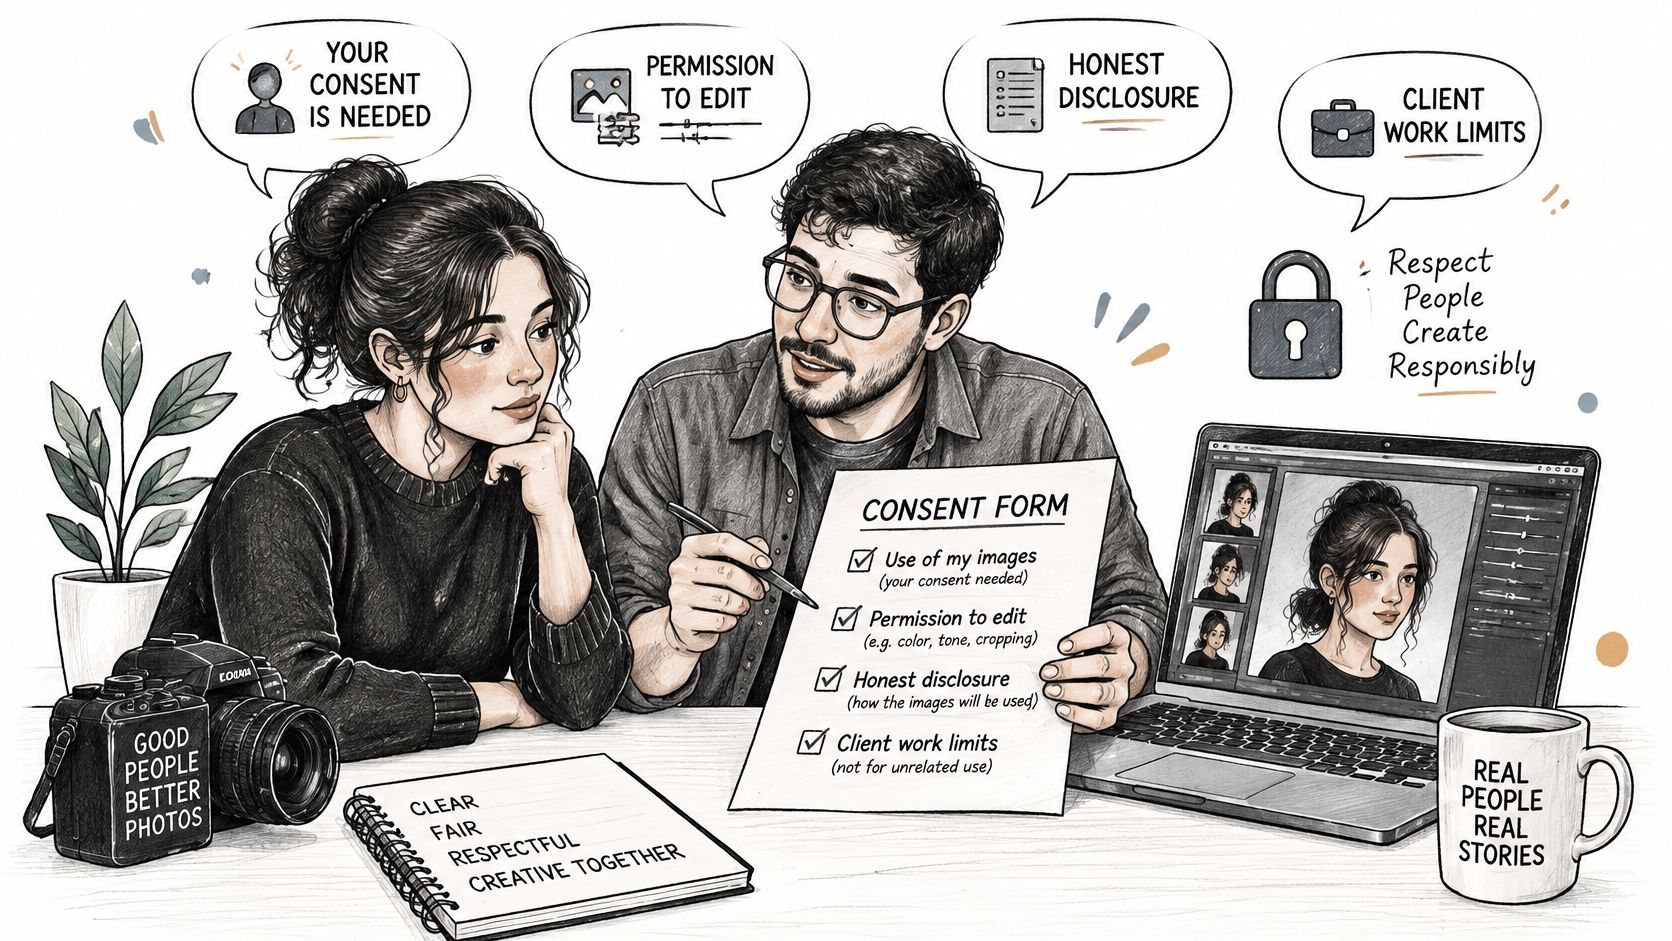
Whose consent do you have? The person pictured should agree to the specific alteration, and the photograph's owner must permit the use and editing. A client's approval doesn't automatically establish either permission.
A generic model release may not cover synthetic alterations. Check whether it authorizes clothing replacement, anatomical changes, generated scenes, and the intended commercial distribution.
Document the actual change
Adjusting a willing model's clothing isn't equivalent to making an identifiable person thinner, more muscular, or sexualized without permission. For sensitive transformations, obtain approval of both the intended edit and the final image.
Use a documented handoff:
- Define authorization. Record the subject, photo rights, permitted changes, channels, and intended audience.
- Preserve evidence. Retain the untouched source, edit history, approval, and published version.
- Disclose material changes. Use clear wording such as AI-altered clothing or AI-generated model where appropriate.
- Reject deception. Decline fabricated fitness results, medical transformations, or edits presented as documentary evidence.
Permission to use a photograph isn't blanket permission to invent a different body.
Understand platform duties and upload handling
A legal discussion of consent and AI image alteration describes EU AI Act transparency obligations for realistic generated or manipulated content and the U.S. Take It Down Act's requirement for covered platforms to remove qualifying intimate depictions within 48 hours of a request. That removal duty applies to covered platforms, not automatically to editors, agencies, or brands. It doesn't make ordinary body editing universally illegal or replace jurisdiction-specific legal advice.
Before uploading client photographs, confirm retention, access, deletion, and training terms. At ImagesArt AI, we don't use user prompts, uploaded media, or generated outputs to train our own foundation models, and we don't sell this content. Our policy also allows anonymized prompt data to improve our AI systems, so avoid putting unnecessary identifying or confidential details into prompts.
How to Run a Controlled Body Edit Step by Step
A controlled edit starts with a narrow instruction, not a long description of an idealized person. Change the garment before attempting a new posture, and solve each visible defect locally.
Prepare a bounded edit
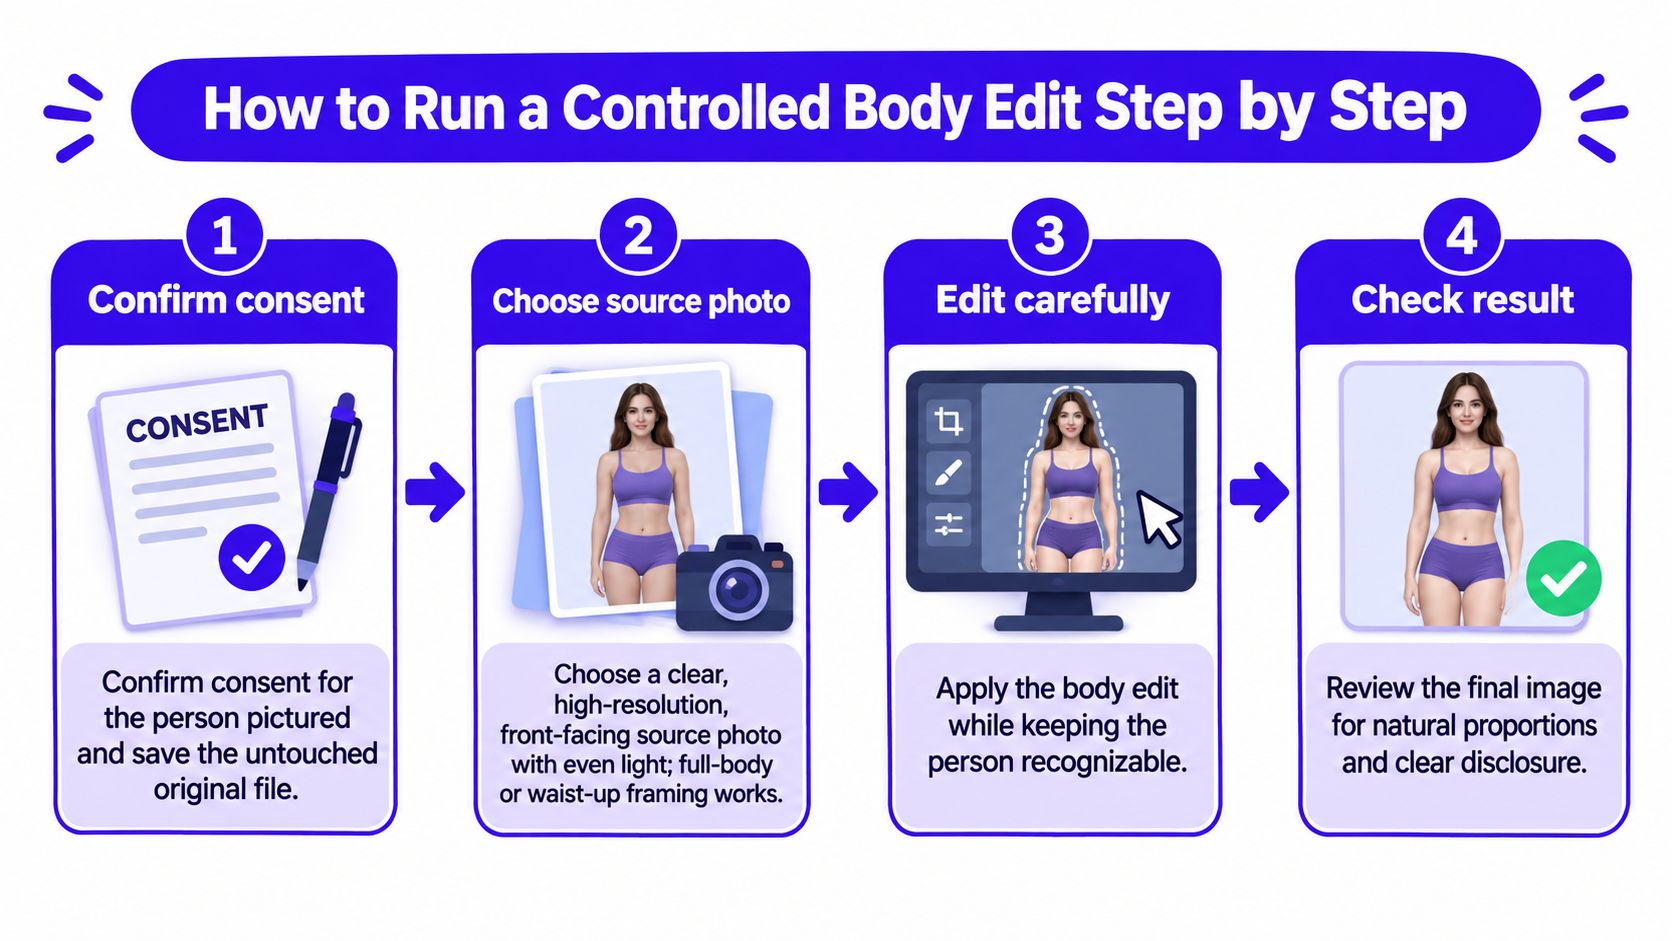
Confirm consent and save the original. Record permission from the person pictured and authorization from the photo owner. The common mistake is saving only an edited copy, leaving no reliable reference for review or rollback.
Choose a clear, high-resolution, front-facing photograph with even lighting and full-body or waist-up framing. Avoid starting with crossed arms, heavy shadows, or compression artifacts when you have a cleaner option; the usual slip is expecting generation to recover details the source never captured.
Write the goal in one sentence. For example: change the gray hoodie to a navy wool sweater. Combining a garment swap, waist adjustment, new pose, and lighting change makes it harder to identify why an output failed.
Mask only the region that needs replacing, including enough boundary space for a natural transition. Masking too widely invites unwanted changes to the face, hands, or body; masking too tightly can leave fragments of the original garment.
Generate, inspect, and deliver
Add pose guidance only when needed, starting at moderate strength where the editor exposes that control. For a posture change, a pose-generation workflow can help establish the target; reduce guidance if limbs warp rather than forcing a conflicting reference.
Generate a small comparison batch at a lower working resolution before committing to the final export. The common mistake is spending the production budget on polished versions of an unproven setup; compare edit accuracy before choosing the prettiest result.
Run the identity, structure, and texture checks independently. Compare the source and output at matching scale, then inspect the garment and hands closely. Don't let improved lighting distract you from altered facial features or a damaged logo.
Repair a flaw by rerunning only the affected mask while preserving approved regions. Full-image regeneration can replace a solved problem with a new one, so avoid restarting unless the source alignment is wrong.
Export for the intended placement, save the edit history, and add disclosure where the commercial image materially changes reality. Skipping final-export review is a common delivery error because cropping and compression can expose defects that weren't obvious in the workspace.
A useful prompt is:
Keep the pose, face, body proportions, hands, and background unchanged. Replace the gray hoodie with a navy wool sweater. Preserve realistic knit texture, sleeve placement, and the existing lighting.
A prompt is a request, not a lock. Use masks and references to enforce scope where available.
If the approved image will become a campaign video, define who owns assembly, captions, and export review. Moonb's guide to video editing services can help you evaluate that handoff without confusing image generation with finished video production.
Output Settings for Reels, TikTok Ads and Product Demos
Start with a 9:16 vertical master, then treat each placement as a different delivery problem. Leave headroom for interface overlays, captions, and safe crops so the edit does not lose the neckline, hands, hem, or logo you worked to protect.
Vertical video specs for body-edit clips
| Placement | Aspect ratio | Minimum resolution | Length guidance |
|---|---|---|---|
| TikTok in-feed ads | 9:16 | 540 × 960 px | 9–15 s recommended; 5–60 s allowed |
| TikTok app-bundle video ads | 9:16 | 720 × 1280 px | 21–30 s recommended; 5–60 s allowed |
| Instagram Reels | 9:16 working master | 1080 × 1920 px vertical export | Under 3 min for new-audience reach; up to 20 min total allowed |
TikTok's in-feed advertising specifications recommend 540 × 960 pixels or higher and 9–15 seconds, allow 5–60 seconds, and accept MP4, MOV, MPEG, or 3GP files of 500 MB or less. For app-promotion campaigns, TikTok's Global App Bundle specifications recommend 720 × 1280 pixels or higher and 21–30 seconds, within an allowed 5–60-second range.
Instagram's Reels guidance allows clips totaling up to 20 minutes, but says Reels longer than 3 minutes will not be recommended to new audiences. Put the garment change, fit result, or product benefit in the first seconds; duration is a limit, not a goal.
Prompt for stable motion
Use a motion prompt that fixes identity first and asks for one readable action, such as: “Keep the person's face, body proportions, hands, pose, clothing logo, background, and lighting unchanged. Camera stays static. Show a slow shoulder turn to reveal the side seam, then return to front. Preserve fabric texture and natural movement.”
Make a short feed-testing cut and a longer explanation cut only when the demonstration needs it. Build longer pieces from approved shots rather than demanding an elaborate sequence from a single generation.
- Choose one camera move. Ask for a slow push-in or a static frame, and remove competing camera instructions.
- Separate actions. Show the garment first, then demonstrate movement; a turn, jump, reveal, and background change in one clip usually produces unstable edges.
- Protect the product. Keep logos, seams, and garment construction visible long enough to inspect before adding captions or disclosure.
For assembling clips and adding disclosure, this guide to video editing without expensive software is a practical starting point. Test motion at a lower setting, then generate the approved clip at the highest suitable resolution your plan allows.
Body Image Risks and a Safe Editing Framework
Editing your own appearance isn't psychologically identical to editing someone else's image. You're comparing the output with a body you live in, which makes repeated reshaping different from trying a new background.
A British Psychological Society summary describes a 2025 study of 187 adults aged 19–66 in which editing one's own face with a slimming filter produced more negative body-image effects than viewing filtered images of other people. It also discusses a separate qualitative study of young adults who made dramatic structural changes to features including shoulders, waist, head, and face.
Keep experimentation separate from self-correction
That doesn't mean every body-related edit is harmful. Clothing visualization, fictional character design, and inclusive representation can serve clear creative purposes without presenting a different body as an improvement.
Use these habits to keep the purpose visible:
- Separate private experiments from publishing. A speculative outfit board doesn't need to become a public comparison of your body. Save exploratory work in a private folder until you've decided what it communicates.
- Keep the original beside the edit. Side-by-side viewing makes the intervention visible instead of allowing the generated version to become your new baseline. Review both at matching size.
- Avoid transformation claims. Don't use reshaping to imply weight loss, muscle gain, or a medical outcome. Replace the concept with a clothing, lighting, or background demonstration.
- Set a stopping rule. Decide on a small revision limit before starting, and stop sooner if you feel worse or keep expanding the requested change. Close the editor rather than negotiating another anatomical adjustment.
A useful boundary: The output is a visual prototype, not a target your body needs to meet.
Ask yourself: Is this edit helping me see a design or a fit, or am I chasing a different body? If the answer shifts toward the latter during a session, stop generating.
Run Your First Controlled Test
Start with a background or clothing-color change on a photograph you have permission to edit. Leave body shape alone so you can evaluate control without introducing an anatomical transformation.
Keep the test easy to judge
- Confirm permissions. Get agreement from the person pictured and authorization from the photo owner for the intended use.
- Save the untouched original in a clearly named folder.
- Mask a single area, such as the shirt, and describe only the replacement color.
- Generate a small set of alternatives without changing the instruction between outputs.
- Apply the identity, structure, and texture checks. Reject options that change the person or invent garment details.
- Label the selected result accurately, and publish only if you'd show the original beside it.
Use the image-editing workspace for this contained test before adding motion. ImagesArt AI offers Text/Image to Video, Start-End Frame, and Reference modes, with Reference accepting up to seven images to guide subject and style. All plans include access to all AI video and image tools, and new accounts receive 15 free credits to start; check the displayed generation cost before submitting your test.
Reference images can guide a scene, but they don't establish consent or guarantee identity preservation. Choose references you're authorized to use and keep the first motion request simple.
Before publishing, answer the decision question: Would I be comfortable labeling this edit and showing the original next to it?
ImagesArt AI combines image-editing tools and short-video generation in one account, so you can test a contained visual change before developing it into a clip. Bring an authorized photo, choose a background or clothing-color edit, and review the result against the original before spending credits on a final version.