Animate Photo Workflow for Reels, Ads and Product Demos
ImagesArt.ai
11/12/2026

You've got a product photo ready for a Reel, but the first animation bends the label and sends the bottle drifting toward the edge. Or your portrait looks convincing until the subject turns and stops looking like the same person. To animate a photo reliably, treat it as a motion-design job: choose movement the image can support, then inspect the entire clip before publishing.
Table of Contents
- How to Animate a Photo in Six Steps
- Resolution, Length and Aspect Ratio by Platform
- Motion Prompts That Keep Your Photo Believable
- Start-End Frames and Reference Images for Control
- Spot Distortion and Flicker Before You Publish
- Check Flash Risk, Rights and Disclosure
- Pick a Mode and Spend the First Credits
How to Animate a Photo in Six Steps
A still photo becomes a clip when the tool generates frames in time order. The photo's framing and the motion you request decide much of the result, so a strong still isn't automatically a strong animation source.
Use this routine to keep the first test manageable.
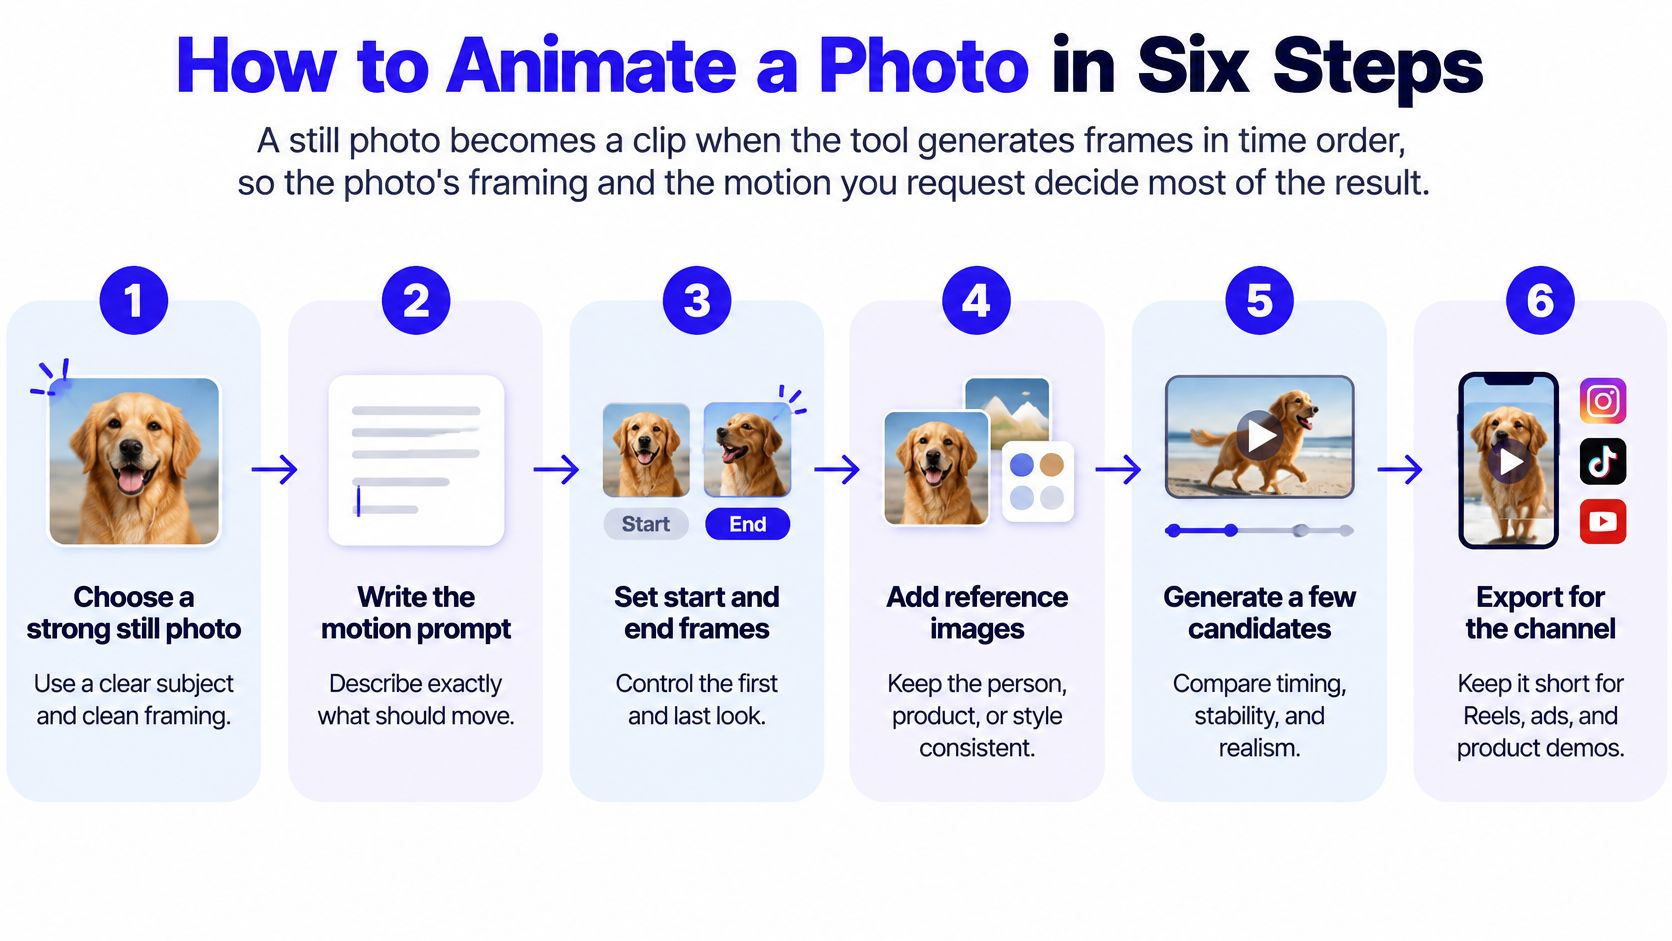
Pick a source with room to move. Choose a sharp subject, even lighting, and clear separation from the background. Leave open space in the direction of travel. A hand already touching the frame edge has nowhere useful to go.
Crop for the destination first. Use a vertical 9:16 composition for Reels and Shorts, or 16:9 for a wide YouTube video. These are working layout choices, not universal upload requirements. Cropping after generation can remove the space you needed for movement.
Choose one dominant motion. Start with a slow push-in, gentle breathing, or hair moving in a breeze. Don't combine a head turn, walking, and a camera orbit in your first attempt. You won't know which instruction caused a failure.
Pick the appropriate mode. Use single-photo image-to-video for one still. Choose start-end frames when the shot must arrive at a specific second image, rather than merely resemble it.
Write the movement and its boundaries. Name the direction, limit, and intended duration, then generate two or three low-cost candidates. For example: animate this portrait with gentle breathing throughout the selected short duration; camera locked; shoulders and background remain still.
Inspect, then download. Review each candidate at full size and reject warped faces or melting backgrounds. Save the keeper beside the original photograph so you can compare them and reproduce the treatment.
Keep the first deliverable simple
Our creation sequence is straightforward: choose a mode, write a prompt or upload an image, click Create, then download the result. The important decisions happen before that click, particularly what should move and what must remain unchanged.
For an explainer, the animated photo can be supporting footage rather than the entire production. Best Faceless Video Generator's resource on narrated videos without showing your face is relevant when you're pairing those visuals with a voice-led story.
A finished clip should have a recognizable subject throughout, one clear movement, and a stable background.
Resolution, Length and Aspect Ratio by Platform
Match the destination's shape before generating, not afterward. Use these as production targets, and confirm the placement's upload settings before final delivery.
| Destination | Aspect ratio | Resolution and frame rate | Layout note |
|---|---|---|---|
| Instagram Reels | 9:16 preferred | Meet Instagram's minimums stated below | Keep the subject away from the top and bottom edges |
| TikTok and YouTube Shorts | 9:16 | Render at 720 px or higher as a working target | Keep captions and key details clear of the bottom edge |
| Paid social feed ad | 4:5 or 1:1 | Match the selected ad placement's export specification | Show the product in the first second |
| YouTube or website video | 16:9 | Match the delivery timeline and player dimensions | Extend the background if the source photo is portrait |
| Product demo slide | 16:9 | Match the slide template's video export settings | Check the crop in the slide template |
Instagram's Reel specifications accept aspect ratios from 1.91:1 through 9:16 and specify a minimum resolution of 720 pixels and a minimum frame rate of 30 frames per second. Export or convert to those minimums or higher, but don't mistake a larger file for a cleaner animation.
Convert the composition, not the product
Don't stretch a wide catalog photograph into a vertical frame. Extend or regenerate the background, center the product, and reserve clear space for captions or a call to action. Stretching changes the product's proportions before animation even begins.
Layout rule: Give moving subjects breathing room inside the final crop, not just inside the original photograph.
Keep shots short enough to communicate the action without lingering on unstable details. A reveal needs enough time to register, but extending a shot also gives appearance drift more opportunity to become visible.
When you're building a video marketing plan, Data Hunters Agency's resource can help frame the broader campaign decisions. Decide where the clip belongs before paying for an export that doesn't fit.
Before posting, play the final file on a phone at full size. Check cropping, text readability, and whether the product stays inside the visible frame throughout its movement.
Motion Prompts That Keep Your Photo Believable
Make the image come alive isn't a useful motion specification. It leaves the model to decide whether the person, camera, lighting, and background should all change.
A better pattern is subject + dominant motion + camera movement + limits + fixed elements. Start with subtle motion, then attempt more demanding movement only after the restrained version holds together.
| Motion | Prompt fragment | Risk to check |
|---|---|---|
| Blinking or gentle breathing | subject breathes slowly, eyes blink once, background stays fixed | Low, inspect eyelids and shoulders |
| Hair or fabric movement | light breeze moves hair, face stays still, nothing else changes | Low, inspect hairline and fabric edges |
| Slow camera push-in | slow 5-degree push-in, subject stays centered, background fixed | Low to medium, inspect perspective |
| Small head turn | head turns 15 degrees left, eyes stay on camera | Medium, check face warping |
| Walking or full rotation | subject walks forward at steady pace, camera holds still | High, check limbs and silhouette |
| Several people moving | two people shift weight, no one leaves frame | High, check identity for each person |
The table's angles and actions are example prompt settings, not guaranteed control precision. A push-in is translational movement, so distance or framing change is technically clearer than degrees when the tool accepts those controls.
Specify what cannot change
Useful constraints include subject stays centered, background stays fixed, preserve label lettering, and lighting remains constant. A bounded prompt example in the VGBE image-to-video consistency paper is “slow 5-degree camera push-in; subject remains centered; background stays fixed.”
For a catalog image, adapt the pattern:
Animate the skincare bottle with a slow, shallow camera push-in throughout the selected duration. Preserve the bottle silhouette, cap, label lettering, and surface finish. Keep the shelf and lighting unchanged.
The source image can't show hidden geometry. Asking a frontal portrait to rotate into a full profile requires the model to invent information, which increases the chance of identity changes.
When artifacts appear, reduce the movement's amplitude, shorten the clip, or simplify the background. If the concept needs several actions, generate separate shots and edit them together instead of forcing everything into one continuous transformation.
Start-End Frames and Reference Images for Control
A single image isn't enough when the clip must finish on an approved packshot. Match the opening and closing frames first, using compatible crops, camera heights, lighting, and product scale.
Use the frame relationship below to plan the transition before generating it.
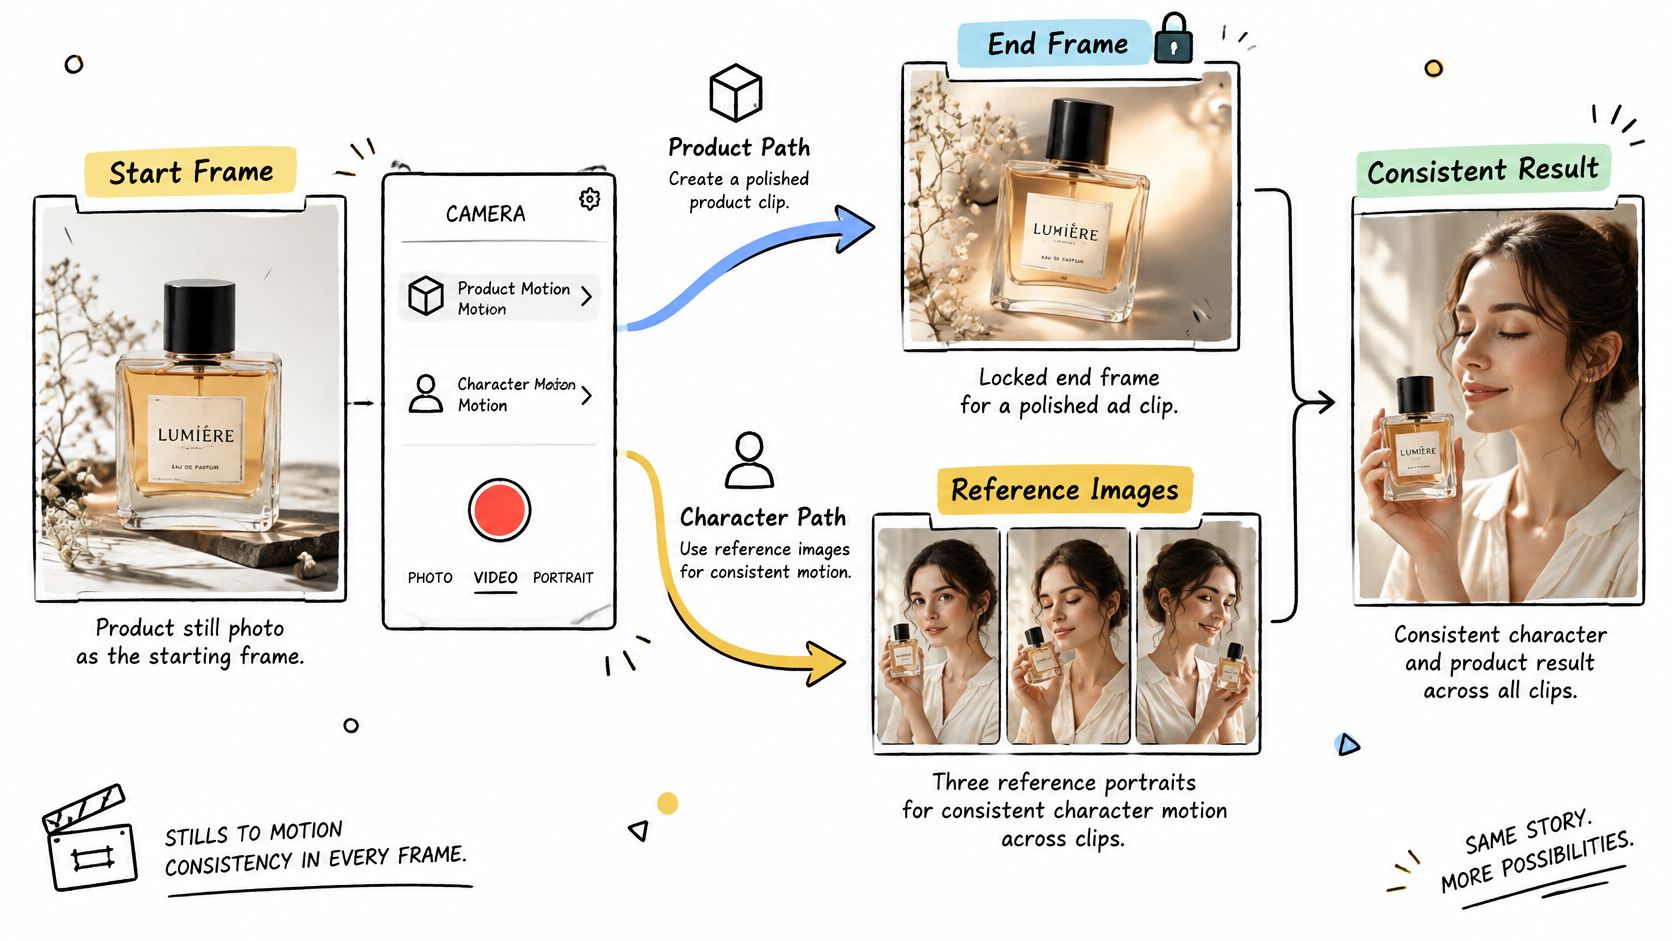
A Start-End Frame workflow supplies both endpoints and describes the movement between them. For a skincare reveal, prepare a bathroom shelf as the opening image and the same composition with the bottle visible as the closing image. Try: camera slides right, bottle rises into frame, background stays fixed.
That prompt contains a practical tension: a camera slide changes background perspective. If the shelf distorts, lock the camera and keep only the bottle reveal. Use start-end frame video when the destination image matters more than improvising the ending.
Use references to define the scene
Reference mode can combine up to 7 images of people, products, or places into one scene. Keep each input clean, with one subject per image and compatible lighting. References describe scene ingredients; they aren't necessarily consecutive frames.
Start with two inputs, such as a product and its intended setting. Add another only when it solves a specific omission or consistency problem. More inputs introduce more constraints, including potentially conflicting angles and shadows.
This video provides another visual reference for planning a controlled animation.
Extra inputs are useful only when they clarify the shot. They don't compensate for mismatched composition.
Skip endpoint and reference controls when you only need a single photograph with restrained movement. The simplest adequate mode leaves fewer decisions to troubleshoot.
Spot Distortion and Flicker Before You Publish
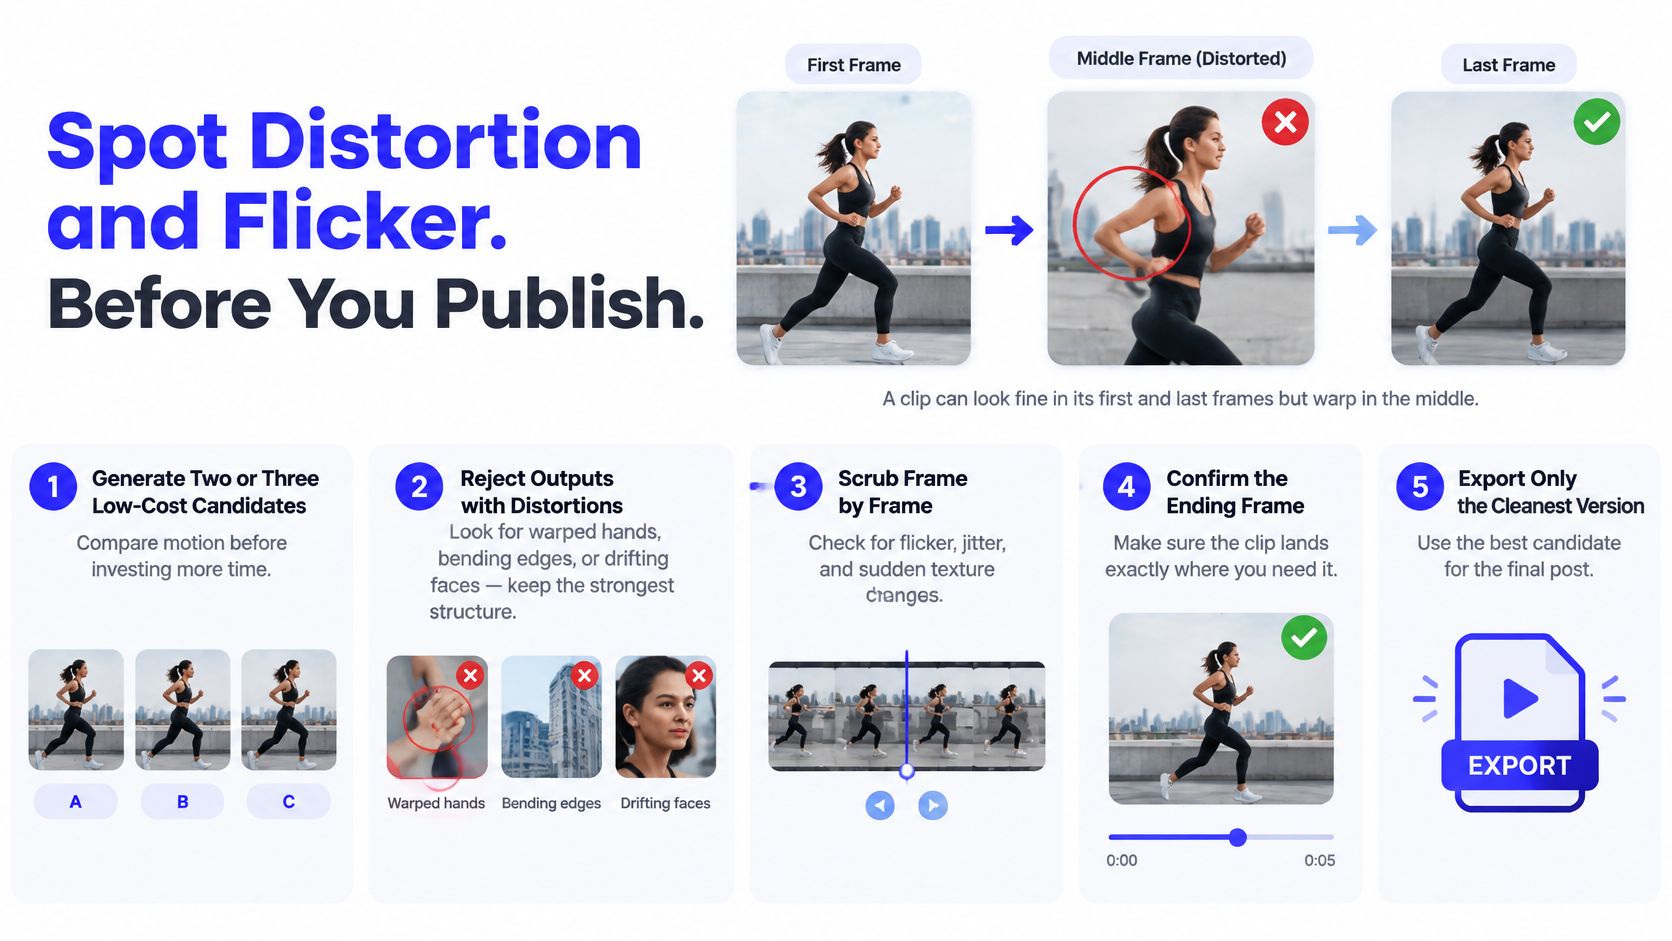
A clip can look correct in its first and last frames while the face warps halfway through. Endpoint approval isn't enough, especially when the subject changes direction or passes behind another object.
Compare low-cost candidates before committing to a final render. Reject structural failures first, then upscale only the strongest version. Separating scene content from motion is also the approach described in this AAAI paper on motion-based video generation, which explains why controlled movement is a more useful starting point than unrestricted transformation.
Use a consistent review order so attractive lighting doesn't distract you from a broken silhouette.
Review structure before polish
- Identity: Compare eyes, mouth, hairline, and distinguishing features with the original. A plausible face can still be the wrong face.
- Product geometry: Inspect the cap, corners, handle, seams, and silhouette. Reject a bottle that subtly changes width.
- Anatomy: Look for duplicated fingers, merging hands, extra limbs, and feet that slide instead of carrying weight.
- Background boundaries: Watch shelf edges, doorframes, and horizon lines for bending or melting.
- Text and logos: Pause during movement. Lettering that becomes unreadable in the middle isn't acceptable just because the ending is sharp.
Use automated checks as warning signals
For repeatable team workflows, frame-to-frame similarity can flag abrupt appearance changes. Facial landmark movement helps identify unstable features; edge-map comparisons reveal bending boundaries; sudden optical-flow spikes can identify unexpected jumps.
These checks don't replace a person watching the clip. A similarity score can favor a nearly frozen output, while a convincing movement may legitimately change many pixels.
Scrub frame by frame around the fastest movement, then compare sampled frames in a grid. Check the ending against the approved composition, not just against the preceding frame.
If one interval fails, trim before it or reduce the requested action. Don't keep buying renders of the same aggressive prompt when a smaller movement would communicate the idea.
Check Flash Risk, Rights and Disclosure
A clip that looks harmless in a small preview can still contain problematic flashes at full-screen size. AI animation can pulse reflections, highlights, or textured backgrounds even when you never requested a strobe.
WCAG 2.2 sets a criterion of no more than three flashes in any one-second period, or flashes below the general and red-flash thresholds. For a conservative creator workflow, remove repeated flashing rather than assuming an effect falls below those thresholds.
Check the final viewing size
The W3C's guidance on three flashes or below threshold calls for evaluating the largest scale at which viewers may experience the content, including full-screen playback.
- Render the intended delivery resolution. Don't approve flash safety from a small editor thumbnail.
- Watch full screen and on a phone. Inspect bright reflections, patterned surfaces, and high-contrast cuts.
- Check every one-second window. Count bright/dark flash cycles; when three flashes occur, check whether the ending light/dark state matches the beginning.
- Repeat after editing. Captions, overlays, and sound-synced cuts can introduce new flashes.
Replace a questionable effect with a dissolve, slower zoom, sideways pan, or gradual brightness change. A useful regeneration instruction is: smooth continuous motion, no flicker, no strobing, stable lighting. That instruction still requires manual review.
Secure permission and explain the edit
Confirm rights to the source file and obtain permission from identifiable people. Don't depict a child, customer, employee, or public figure performing an action they never performed. Keep the original, prompt, permission record, and final export together.
A photo's availability online isn't permission to animate it. For client artwork or archival images, establish who can authorize modification and publication before uploading.
Don't rely on viewers to recognize synthetic motion. A September 2025 survey summarized by Status Labs found respondents correctly identified real images 49% of the time and AI-generated images 52% of the time, while 42% were confident in their detection ability.
Use a visible caption label such as AI-animated from an original photo, and credit the photographer or artist. For commercial work, explain whether the animation illustrates a concept rather than real product behavior; the same distinction matters when planning AI video advertising.
Pick a Mode and Spend the First Credits
Choose the least complicated mode that can produce the approved shot. A subtle portrait doesn't need a reference-heavy scene, and an approved closing packshot shouldn't depend on an open-ended generation.
Match the mode to the deliverable
- Text/Image to Video: Creates video from a written prompt or animates one uploaded photo, with camera movement and native sound.
- Start-End Frame: Use it when the clip must land on a supplied closing still.
- Reference: Combine people, products, or places when a single source image can't define the scene.
ImagesArt provides these controls alongside Seedance, Kling, Veo, and other models in one place. The generation control displays the credit cost before submission; compare it with the duration and resolution you need. Our guide to AI pricing models can help you evaluate that trade-off.
New accounts receive 15 free credits without a credit card. Use the allocation toward short test candidates rather than assuming it covers every model or final-resolution setting. If you're developing ad variants, the AI ad generator by Next Point Digital is another relevant resource for the broader creative workflow.
Choose one clean catalog or portfolio photo this week. Test a restrained movement, export the keeper, and file it with the source and successful prompt. Add a disclosure line where the animation could otherwise be mistaken for recorded action.
ImagesArt AI offers photo animation, start-end frame control, and reference-based video generation in one workspace. Visit ImagesArt AI to test one short motion treatment with your free credits, then review the full-size result before committing to a final render.